Wasserstein GANs
Now that we have introduced the Wasserstein metric both theoretically and practically in the last few posts, let us apply it to Generative Adversarial Networks (GANs) and explore how and why they are trained more effectively. We compare a default GAN with a Wasserstein GAN (WGAN), both trained on the MNIST dataset, and discuss the advantages and disadvantages of each approach.

Generative Adversarial Networks
Generative Adversarial Networks (GANs), introduced by Goodfellow et al. in 2014ꜛ, are a class of generative models that have gained significant popularity in recent years. GANs are a type of unsupervised learning model that can learn to generate data samples that follow the true data distribution. They are typically used to generate images, videos, and audio samples.
 Schematic of a Generative Adversarial Networks (GAN). A GAN consists of two components: the generator and the discriminator. The generator tries to generate data samples that follow the true data distribution, while the discriminator’s role is to differentiate between real and generated data samples. Via the loss function, the generator and discriminator are trained in an adversarial manner. Own drawing.
GANs consist of two principal components: the generator and the discriminator. The generator tries to generate data samples that follow the true data distribution, while the discriminator’s role is to differentiate between real and generated data samples.
The loss function in GANs is defined based on the game-theoretic concept of a two-player minimax gameꜛ. The generator aims to minimize the function, whereas the discriminator strives to maximize it. Let $G$ be the generator and $D$ the discriminator. The value function $V(G, D)$ for the minimax game is as follows:
\[\min_G \max_D V(D, G) = E_{x\sim p_data(x)}[\log D(x)]\] \[+ E_{z\sim p_z(z)}[\log(1 - D(G(z)))]\]Here, the first term of the value function represents the expected value of the log-probability of the discriminator correctly classifying a real sample. The second term indicates the expected value of the log-probability of the discriminator incorrectly classifying a sample from the generator.
Issues with GANs
Despite the theoretical elegance and practical success of GANs, they are prone to some issues:
- Mode collapse: This phenomenon occurs when the generator produces limited varieties of samples, thereby failing to capture the diversity of the real data distribution. If you want to learn more about, I recommend reading the post Mode Collapse and WGANsꜛ by Kun Ouyang, which provide a more in-depth discussion.
- Vanishing gradients: During the training process, the discriminator may become so efficient that it perfectly classifies the real and fake samples, causing the gradients that update the generator to vanish. This situation hinders further learning. The Wikipedia article on the Vanishing gradient problemꜛ from Wikipedia provides a good overview of this issue.
Wasserstein GANs
To mitigate the issues related to GANs, Arjovsky et al.ꜛ introduced Wasserstein GANs (WGANs) in 2017. WGANs leverage the concept of the Earth Mover’s (Wasserstein) distance to measure the distance between the real and generated distributions.
The fundamental innovation in WGAN is the replacement of the standard GAN loss function with the Wasserstein loss function. This change offers a more stable training process, primarily because the Wasserstein distance provides meaningful and smooth gradients almost everywhere.
The WGAN value function is defined as follows:
\[\min_G \max_D V(D, G) = E_{x\sim p_data(x)}[D(x)] -\] \[E_{z\sim p_z(z)}[D(G(z))]\]Note that to ensure the Lipschitz continuityꜛ of the discriminator function, WGANs use weight clippingꜛ or gradient penaltyꜛ.
From a performance perspective, WGANs typically generate higher quality samples compared to standard GANs, especially with a lower number of training epochs. Moreover, WGANs have shown better resistance to mode collapseꜛ and provide more stable and reliable training convergence.
However, GANs and WGANs both have their unique strengths and potential use cases. Standard GANs are relatively simple to understand and implement, and they have a wide range of variations and extensions for diverse applications. On the other hand, WGANs, with their theoretical robustness, offer an excellent solution to the typical problems encountered in GANs, making them suitable for applications where model stability is crucial.
Implementing GAN in Python
Before we dive into the implementation of WGANs, let’s first take a look at a standard GAN. We will use the MNIST datasetꜛ of handwritten digits for this task. The dataset consists of 60,000 training images and 10,000 test images. Each image is a 28x28 grayscale image of a handwritten digit.
We use the code from the TensorFlow tutorial on DCGANꜛ as a starting point. DCGAN stands for Deep Convolutional Generative Adversarial Network, proposed by Radford et al. in 2015ꜛ. It is a type of GAN that uses convolutional layers in the discriminator and generator networks. I just modified the code in such a way, that it also stores and plots the average loss of the generator and discriminator during the training process.
The code starts with importing the necessary libraries and loading the MNIST dataset:
import tensorflow as tf
import glob
import imageio
import matplotlib.pyplot as plt
import numpy as np
import PIL
from tensorflow.keras import layers
import time
from IPython import display
import os
# check whether GAN_images folder is already there, otherwise create it:
if not os.path.exists('GAN_images'):
    os.makedirs('GAN_images')
# %% LOAD DATA AND DEFINE MODEL PARAMETERS
(train_images, train_labels), (_, _) = tf.keras.datasets.mnist.load_data()

train_images = train_images.reshape(train_images.shape[0], 28, 28, 1).astype('float32')
train_images = (train_images - 127.5) / 127.5  # Normalize the images to [-1, 1]

BUFFER_SIZE = 60000
BATCH_SIZE = 256

# batch and shuffle the data:
train_dataset = tf.data.Dataset.from_tensor_slices(train_images).shuffle(BUFFER_SIZE).batch(BATCH_SIZE)
The training data is then batched and shuffled. The batch size is set to 256 and the buffer size to 60,000. The buffer size is the number of elements from the dataset from which the new dataset will sample.
Next, we define the generator and discriminator models. The generator uses the tf.keras.layers.Conv2DTranspose (upsampling) layers to produce an image from a seed (random noise):
def make_generator_model():
    model = tf.keras.Sequential()
    model.add(layers.Dense(7*7*256, use_bias=False, input_shape=(100,)))
    model.add(layers.BatchNormalization())
    model.add(layers.LeakyReLU())

    model.add(layers.Reshape((7, 7, 256)))
    assert model.output_shape == (None, 7, 7, 256)  # Note: None is the batch size

    model.add(layers.Conv2DTranspose(128, (5, 5), strides=(1, 1), padding='same', use_bias=False))
    assert model.output_shape == (None, 7, 7, 128)
    model.add(layers.BatchNormalization())
    model.add(layers.LeakyReLU())

    model.add(layers.Conv2DTranspose(64, (5, 5), strides=(2, 2), padding='same', use_bias=False))
    assert model.output_shape == (None, 14, 14, 64)
    model.add(layers.BatchNormalization())
    model.add(layers.LeakyReLU())

    model.add(layers.Conv2DTranspose(1, (5, 5), strides=(2, 2), padding='same', use_bias=False, activation='tanh'))
    assert model.output_shape == (None, 28, 28, 1)

    return model

generator = make_generator_model()
noise = tf.random.normal([1, 100])
generated_image = generator(noise, training=False)
plt.imshow(generated_image[0, :, :, 0], cmap='gray')
The discriminator is a CNN-based image classifier:
def make_discriminator_model():
    model = tf.keras.Sequential()
    model.add(layers.Conv2D(64, (5, 5), strides=(2, 2), padding='same',
                                     input_shape=[28, 28, 1]))
    model.add(layers.LeakyReLU())
    model.add(layers.Dropout(0.3))

    model.add(layers.Conv2D(128, (5, 5), strides=(2, 2), padding='same'))
    model.add(layers.LeakyReLU())
    model.add(layers.Dropout(0.3))

    model.add(layers.Flatten())
    model.add(layers.Dense(1))

    return model

discriminator = make_discriminator_model()
decision = discriminator(generated_image)
print (decision)
The loss functions for the generator and discriminator are defined as follows:
# this method returns a helper function to compute cross entropy loss:
cross_entropy = tf.keras.losses.BinaryCrossentropy(from_logits=True)

# discriminator loss:
def discriminator_loss(real_output, fake_output):
    real_loss = cross_entropy(tf.ones_like(real_output), real_output)
    fake_loss = cross_entropy(tf.zeros_like(fake_output), fake_output)
    total_loss = real_loss + fake_loss
    return total_loss

# generator loss:
def generator_loss(fake_output):
    return cross_entropy(tf.ones_like(fake_output), fake_output)
We use cross-entropy loss for both the generator and discriminator. The discriminator loss function compares the discriminator’s predictions on real images to an array of 1s, and the discriminator’s predictions on fake (generated) images to an array of 0s. The generator loss function compares the discriminator’s predictions on fake images to an array of 1s.
As optimizer, we use the Adam optimizer with a learning rate of 0.0001:
generator_optimizer = tf.keras.optimizers.Adam(1e-4)
discriminator_optimizer = tf.keras.optimizers.Adam(1e-4)

# save checkpoints:
checkpoint_dir = './training_checkpoints'
checkpoint_prefix = os.path.join(checkpoint_dir, "ckpt")
checkpoint = tf.train.Checkpoint(generator_optimizer=generator_optimizer,
                                 discriminator_optimizer=discriminator_optimizer,
                                 generator=generator,
                                 discriminator=discriminator)
The main training loop is defined as follows:
noise_dim = 100
num_examples_to_generate = 16
seed = tf.random.normal([num_examples_to_generate, noise_dim])

gen_losses = []
disc_losses = []
avg_gen_losses_per_epoch = []
avg_disc_losses_per_epoch = []

# This annotation causes the function to be "compiled".
@tf.function
def train_step(images):
    noise = tf.random.normal([BATCH_SIZE, noise_dim])

    with tf.GradientTape() as gen_tape, tf.GradientTape() as disc_tape:
      generated_images = generator(noise, training=True)

      real_output = discriminator(images, training=True)
      fake_output = discriminator(generated_images, training=True)

      gen_loss = generator_loss(fake_output)
      disc_loss = discriminator_loss(real_output, fake_output)

    gradients_of_generator = gen_tape.gradient(gen_loss, generator.trainable_variables)
    gradients_of_discriminator = disc_tape.gradient(disc_loss, discriminator.trainable_variables)

    generator_optimizer.apply_gradients(zip(gradients_of_generator, generator.trainable_variables))
    discriminator_optimizer.apply_gradients(zip(gradients_of_discriminator, discriminator.trainable_variables))

    return gen_loss, disc_loss

def train(dataset, epochs):
  for epoch in range(epochs):
    start = time.time()

    for image_batch in dataset:
      gen_loss, disc_loss = train_step(image_batch)
      gen_losses.append(gen_loss)
      disc_losses.append(disc_loss)

    # calculate average generator and discriminator loss for the current epoch:
    avg_gen_loss_this_epoch = np.mean(gen_losses)
    avg_disc_loss_this_epoch = np.mean(disc_losses)

    # append these averages to our new lists:
    avg_gen_losses_per_epoch.append(avg_gen_loss_this_epoch)
    avg_disc_losses_per_epoch.append(avg_disc_loss_this_epoch)

    # clear the lists for the next epoch:
    gen_losses.clear()
    disc_losses.clear()

    # produce images for the GIF as you go:
    display.clear_output(wait=True)
    generate_and_save_images(generator,
                             epoch + 1,
                             seed)

    # save the model every 15 epochs:
    if (epoch + 1) % 15 == 0:
      checkpoint.save(file_prefix = checkpoint_prefix)

    print ('Time for epoch {} is {} sec'.format(epoch + 1, time.time()-start))

  # generate after the final epoch:
  display.clear_output(wait=True)
  generate_and_save_images(generator,
                           epochs,
                           seed)

  return avg_gen_losses_per_epoch, avg_disc_losses_per_epoch
We also define a function to generate and save images:
def generate_and_save_images(model, epoch, test_input):
  # Note, that `training` is set to False. This is so all layers run in
  # inference mode (batchnorm).
  predictions = model(test_input, training=False)

  fig = plt.figure(figsize=(4, 4))

  for i in range(predictions.shape[0]):
      plt.subplot(4, 4, i+1)
      plt.imshow(predictions[i, :, :, 0] * 127.5 + 127.5, cmap='gray')
      plt.axis('off')
  # annotate the figure with the epoch number
  plt.suptitle(f"Epoch: {epoch}", fontsize=16)
  plt.savefig('GAN_images/image_at_epoch_{:04d}.png'.format(epoch))
  plt.show()
Finally, we train the model for 50 epochs:
# define the training parameters:
EPOCHS = 50

avg_gen_losses_per_epoch, avg_disc_losses_per_epoch = train(train_dataset, EPOCHS)
After the training, we create a GIF of the generated images and plot the average generator and discriminator loss as a function of the training epochs:
# restore the latest checkpoint:
checkpoint.restore(tf.train.latest_checkpoint(checkpoint_dir))

# display a single image using the epoch number:
def display_image(epoch_no):
  return PIL.Image.open('GAN_images/image_at_epoch_{:04d}.png'.format(epoch_no))
display_image(EPOCHS)

anim_file = 'GAN_images/depp_conv_gan.gif'

with imageio.get_writer(anim_file, mode='I') as writer:
  filenames = glob.glob('GAN_images/image*.png')
  filenames = sorted(filenames)
  for filename in filenames:
    image = imageio.imread(filename)
    writer.append_data(image)
  image = imageio.imread(filename)
  writer.append_data(image)

# plot losses:
plt.figure(figsize=(10,5))
plt.title("Average Generator and Discriminator Loss During Training")
plt.plot(avg_gen_losses_per_epoch,label="Generator")
plt.plot(avg_disc_losses_per_epoch,label="Discriminator")
plt.xlabel("Epochs")
plt.ylabel("Loss")
plt.legend()
plt.show()
Here is the resulting GIF, showing the generated images during the training process:

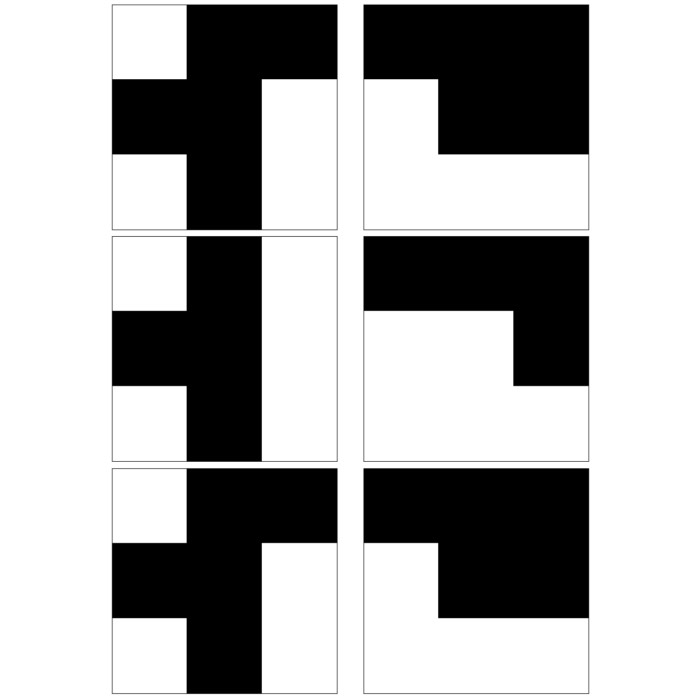
 Generated images during the training process of the GAN. Displayed are the results as a GIF for 50 epochs (top) and six selected snapshots (bottom). The images are generated from a random noise vector and the GAN tries to generate new images of handwritten digits, according to the MNIST dataset on which it was trained.
And the according loss of the generator and discriminator:
 The training loss of the generator and discriminator of the GAN.
The GAN nearly needs the full range of 50 epochs to converge and is able to generate images that resemble handwritten digits latest at the end of the training process. The difference between the generator and discriminator losses is large at the beginning and diminishes slowly over time. Further improvements could be achieved by increasing the number of training epochs or tuning the hyperparameters. However, for now we will leave it at that and turn to the implementation of the WGAN, just to see how it performs in comparison to the GAN under the given conditions.
Implementing WGAN in Python
To implement the Wasserstein GAN (WGAN), we use the same code as above. We will implement the WGAN with gradient penalty (WGAN-GP). The necessary main modifications to the code are as follows:
- Changing the loss functions to be the Wasserstein loss instead of the BinaryCrossentropy loss.
- Adding gradient penalty in discriminator loss to enforce Lipschitz constraint (this is a key part of WGAN-GP).
- Changing the discriminator’s output activation to linear instead of sigmoid.
- Using a different optimizer (RMSprop is commonly used in WGANs).
- Updating the discriminator more often than the generator (typically five discriminator updates per generator update).
- Removing the Dropout layers from the discriminator, as they are typically not used in WGANs.
Here are the corresponding changes in the code:
# Changing to RMSprop optimizers with learning rate 0.00005 (typical values for WGANs):
generator_optimizer = tf.keras.optimizers.RMSprop(0.00005)
discriminator_optimizer = tf.keras.optimizers.RMSprop(0.00005)
# Changing the last layer of the discriminator to have a linear activation:
def make_discriminator_model():
    model = tf.keras.Sequential()
    model.add(layers.Conv2D(64, (5, 5), strides=(2, 2), padding='same',
                                     input_shape=[28, 28, 1]))
    model.add(layers.LeakyReLU())

    model.add(layers.Conv2D(128, (5, 5), strides=(2, 2), padding='same'))
    model.add(layers.LeakyReLU())

    model.add(layers.Flatten())
    model.add(layers.Dense(1))  # No activation here

    return model
# Changing to Wasserstein loss:
def discriminator_loss(real_output, fake_output):
    real_loss = -tf.reduce_mean(real_output)
    fake_loss = tf.reduce_mean(fake_output)
    return real_loss + fake_loss

def generator_loss(fake_output):
    return -tf.reduce_mean(fake_output)
# Adding gradient penalty (GP) for the discriminator:
def gradient_penalty(real_images, fake_images):
    alpha = tf.random.uniform(shape=[real_images.shape[0], 1, 1, 1], minval=0., maxval=1.)
    diff = fake_images - real_images
    interpolated = real_images + alpha * diff

    with tf.GradientTape() as gp_tape:
        gp_tape.watch(interpolated)
        pred = discriminator(interpolated, training=True)

    grads = gp_tape.gradient(pred, [interpolated])[0]
    norm = tf.sqrt(tf.reduce_sum(tf.square(grads), axis=[1, 2, 3]))
    gp = tf.reduce_mean((norm - 1.)**2)

    return gp
# Including the gradient penalty in the training step:
@tf.function
def train_step(real_images):
    noise = tf.random.normal([BATCH_SIZE, noise_dim])

    with tf.GradientTape() as gen_tape, tf.GradientTape() as disc_tape:
        generated_images = generator(noise, training=True)

        real_output = discriminator(real_images, training=True)
        fake_output = discriminator(generated_images, training=True)

        gen_loss = generator_loss(fake_output)

        disc_loss = discriminator_loss(real_output, fake_output)
        gp = gradient_penalty(real_images, generated_images)
        disc_loss += gp * 10  # The gradient penalty weight is typically set to 10

    gen_gradients = gen_tape.gradient(gen_loss, generator.trainable_variables)
    disc_gradients = disc_tape.gradient(disc_loss, discriminator.trainable_variables)

    discriminator_optimizer.apply_gradients(zip(disc_gradients, discriminator.trainable_variables))
    generator_optimizer.apply_gradients(zip(gen_gradients, generator.trainable_variables))

    return gen_loss, disc_loss
# Modifying the train function to perform 5 discriminator updates per generator update:
def train(dataset, epochs):
    for epoch in range(epochs):
        start = time.time()

        for image_batch in dataset:
            for _ in range(5):  # Update the discriminator 5 times
                gen_loss, disc_loss = train_step(image_batch)
            gen_losses.append(gen_loss)
            disc_losses.append(disc_loss)

        # Rest of the training loop remains the same...
This is a basic implementation of a WGAN-GP. For full details and variations of this algorithm, please refer to the original paper, “Improved Training of Wasserstein GANs” by Gulrajani et al., 2017ꜛ. The complete code can be found in the GitHub repository linked at the end of this post.
Here is the resulting GIF:

 Generated images during the training process of the WGAN. Displayed are the results as a GIF for 50 epochs (top) and six selected snapshots (bottom). The images are generated from a random noise vector and the GAN tries to generate new images of handwritten digits, according to the MNIST dataset on which it was trained.
And the according loss of the generator and discriminator:
 The training loss of the generator and discriminator of the WGAN.
The WGAN converges much faster than the GAN. Already after 5 to 7 epochs, the WGAN is able to generate images that resemble handwritten digits. However, the behavior of the loss curves in the WGAN is quite interesting and distinct from the standard GAN. The loss of the discriminator, starting at around -2.5, converges to 0 after 7 epochs, while the loss of the generator keeps improving over the 50 epochs from around -11 to -8, i.e., the gap between the discriminator and generator loss continuously diminishes. To properly understand this, let’s take a closer look at the loss functions used in both models.
Loss functions and their behavior
In a standard GAN, the discriminator loss is the binary cross-entropy loss, which tries to correctly classify real and fake (generated) samples. This loss is always positive, with a value of zero indicating perfect classification. The generator loss, also a binary cross-entropy loss, tries to ‘fool’ the discriminator into misclassifying fake samples as real. This loss is minimized when the generator can fool the discriminator most of the time.
In contrast, a WGAN replaces the cross-entropy loss functions with a Wasserstein loss function. This is defined as the difference between the average scores assigned by the discriminator to the real and fake samples.
So, for the generator loss (which tries to minimize this difference), when the generator starts getting good at generating realistic samples, the discriminator’s scores for the real and fake samples will be close, making the difference (and hence the loss) small.
Negative losses in WGAN
Coming to the aspect of the observed negative losses in WGAN, this is an inherent feature of the Wasserstein loss. The discriminator in a WGAN is trained to maximize the difference between the average scores for the real and fake samples ($\max_D [E[D(x)] - E[D(G(z))]]$). This means the discriminator tries to assign higher scores to real samples compared to the fake ones.
During the early stages of training, when the generator isn’t producing very realistic samples, the discriminator can easily differentiate and assign significantly lower scores to the fake samples, resulting in a larger difference and hence a larger (negative) loss for the generator.
As the generator improves and starts to produce more realistic samples, the discriminator finds it harder to differentiate between the real and fake samples. The scores for real and fake samples get closer, and the difference (and hence the generator’s loss) reduces in magnitude. This is why the generator’s loss improves from around -11 to -8.
In essence, the negative value of the loss in WGAN is not a sign of something wrong but rather a characteristic feature of the Wasserstein loss function.
Faster convergence of WGAN
The Wasserstein distance that WGAN uses for its loss function provides smooth and meaningful gradients almost everywhere. This is a key advantage of the WGAN and makes the training process more stable. As a result, WGANs often converge faster than standard GANs.
Moreover, unlike the original GANs, the training of WGAN doesn’t involve a balancing act between the generator and the discriminator. The two networks are not competing in a zero-sum game, but rather cooperating to minimize a common loss function. This change results in a stable training process, even if the discriminator is temporarily winning or losing. This aspect could explain the quick convergence of the discriminator’s loss to zero in our case.
Summary
In conclusion, the behavior of the loss curves in WGAN and the resulting faster convergence underline the practical advantages of using Wasserstein loss and its utility in training stable and efficient generative models.
Conclusion
Wasserstein Generative Adversarial Networks (WGANs) represent a significant advancement in the field of generative models. Their unique features make them an excellent choice for a variety of applications requiring the generation of realistic data.
The most distinctive advantage of WGANs lies in their utilization of the Wasserstein distance in their loss function. This fundamentally changes the training dynamics of generative models, addressing several limitations associated with the traditional GANs.
- Convergence: The Wasserstein loss provides smooth and meaningful gradients almost everywhere, a property that is invaluable in complex, high-dimensional problems. This leads to better convergence properties, often converging faster than the traditional GANs.
- Stability: The training process of WGANs is more stable as the two networks, the generator and discriminator, are not involved in a balancing act as in the traditional GANs. They cooperate to minimize a common loss function, which prevents the common problem of mode collapse.
- Interpretability: The discriminator in WGANs does not classify but instead measures a form of distance between the real and generated data distributions. This results in the loss functions of WGANs being more interpretable as they provide an approximation of the Wasserstein distance between real and generated distributions.
- Improved quality: WGANs typically generate data of higher quality, as evidenced by lower loss and visually more convincing generated images, even in early stages of training.
In summary, WGANs have proven to be a significant advancement in the field of generative models. Their unique features make them an excellent choice for working with generative models. However, it is important to note that WGANs are not a panacea for all the problems associated with GANs. They have their own limitations and are not always the best choice for every application. Nevertheless, they are a powerful tool.
The code used in this post is available in this GitHub repositoryꜛ.
If you have any questions or suggestions, feel free to leave a comment below.

Comments
Comment on this post by publicly replying to this Mastodon post using a Mastodon or other ActivityPub/Fediverse account.
Comments on this website are based on a Mastodon-powered comment system. Learn more about it here.
There are no known comments, yet. Be the first to write a reply.