Conditional GANs
After playing around with generative models, specifically with Generative Adversarial Networks (GANs) and Wasserstein GANs, I was wondering whether it would be possible to let GANs generate samples conditioned on a specific input type. In terms of the MNIST dataset, I wanted the GAN to generate samples of a specific digit, resembling a personal poor man’s mini DALL•E. And indeed, I found a GAN architecture, that allows what I was looking for: Conditional GANs.

What is a Conditional Generative Adversarial Network (cGAN)?
Traditional GANs lack control over the types of images they generate. In contrast, conditional Generative Adversarial Networks (cGANs) enable the control over the output of the generator. cGANs are an extension of the original GAN framework where both the generator and discriminator are conditioned on some additional information $y$. This information can be any kind of auxiliary information, such as class labels or data from other modalities. By conditioning the model on additional information, it can be directed to generate data with specific attributes.
Structure of a cGAN
The cGAN framework comprises two key components: the generator $G$ and the discriminator $D$. The generator is tasked with creating synthetic data, while the discriminator works as a classifier to distinguish between real and synthetic data. The generator $G$ takes in a latent vector $z$ and the condition $y$, and generates data $G(z, y)$. The discriminator $D$ receives either real data $x$ and the condition $y$, or synthetic data and the condition $y$, and outputs a score $D(x, y)$ representing the authenticity of the received data.
Training the cGAN
The training process of a cGAN is similar to that of a regular GAN, except for the inclusion of the conditional vector at both the generator and discriminator levels. The process consists of a two-player minimax game where the generator attempts to fool the discriminator by generating synthetic data as close as possible to the real data, while the discriminator tries to distinguish between the real and synthetic data. The objective function of a cGAN is defined as follows:
\[\min_G \max_D V(D, G) = E_x\sim p_{data}(x)[\log D(x|y)]\] \[+ E_z\sim p_z(z)[\log(1 - D(G(z|y))]\]Here, $E$ represents the expectation, $p_{data}(x)$ is the true data distribution, and $p_z(z)$ is the input noise distribution. $x\sim p_{data}(x)$ means that $x$ is drawn from the true data distribution $p_{data}(x)$, and $z\sim p_z(z)$ means that $z$ is drawn from the input noise distribution $p_z(z)$.
During the training process, the weights of the generator and discriminator are updated alternately. First, the discriminator’s weights are updated while keeping the generator’s weights fixed, and then the generator’s weights are updated while keeping the discriminator’s weights fixed.
Implement and train a cGAN in Python
The code base of the following example comes from this Keras tutorialꜛ.
We start with the imports and defining the constants and hyperparameters. num_channels refers to the number of color channels, which is 1 for grayscale images like MNIST. num_classes is the number of distinct classes (in our case 10 for 10 digits), and latent_dim represents the size of the random noise vector used for generating images:
from tensorflow import keras
from tensorflow.keras import layers
import tensorflow as tf
import numpy as np
import matplotlib.pyplot as plt
import imageio

# %% Constants and hyperparameters
batch_size = 64
num_channels = 1
num_classes = 10
image_size = 28
latent_dim = 128
Next, we load the MNIST dataset and preprocessing it. The images are normalized to the range of $[0, 1]$, reshaped to ensure they have a channel dimension, and their labels are one-hot encodedꜛ. The dataset is then shuffled and batched:
# use all the available examples from both the training and test sets:
(x_train, y_train), (x_test, y_test) = keras.datasets.mnist.load_data()
all_digits = np.concatenate([x_train, x_test])
all_labels = np.concatenate([y_train, y_test])

# scale the pixel values to [0, 1] range, add a channel dimension to
# the images, and one-hot encode the labels:
all_digits = all_digits.astype("float32") / 255.0
all_digits = np.reshape(all_digits, (-1, 28, 28, 1))
all_labels = keras.utils.to_categorical(all_labels, 10)

# create tf.data.Dataset:
dataset = tf.data.Dataset.from_tensor_slices((all_digits, all_labels))
dataset = dataset.shuffle(buffer_size=1024).batch(batch_size)

print(f"Shape of training images: {all_digits.shape}")
print(f"Shape of training labels: {all_labels.shape}")
Then, we define the generator and discriminator models. The generator takes a noise vector and a class label as input, merges them, and generates an image. The discriminator takes an image and a class label as input, merges them, and classifies whether the image is real or fake:
# calculating the number of input channels for the generator and discriminator:
generator_in_channels = latent_dim + num_classes
discriminator_in_channels = num_channels + num_classes
print(generator_in_channels, discriminator_in_channels)

# create the discriminator:
discriminator = keras.Sequential(
    [keras.layers.InputLayer((28, 28, discriminator_in_channels)),
     layers.Conv2D(64, (3, 3), strides=(2, 2), padding="same"),
     layers.LeakyReLU(alpha=0.2),
     layers.Conv2D(128, (3, 3), strides=(2, 2), padding="same"),
     layers.LeakyReLU(alpha=0.2),
     layers.GlobalMaxPooling2D(),
     layers.Dense(1)],
    name="discriminator")

# create the generator:
generator = keras.Sequential(
    [keras.layers.InputLayer((generator_in_channels,)),
     # we want to generate 128 + num_classes coefficients to reshape into a
     # 7x7x(128 + num_classes) map:
     layers.Dense(7 * 7 * generator_in_channels),
     layers.LeakyReLU(alpha=0.2),
     layers.Reshape((7, 7, generator_in_channels)),
     layers.Conv2DTranspose(128, (4, 4), strides=(2, 2), padding="same"),
     layers.LeakyReLU(alpha=0.2),
     layers.Conv2DTranspose(128, (4, 4), strides=(2, 2), padding="same"),
     layers.LeakyReLU(alpha=0.2),
     layers.Conv2D(1, (7, 7), padding="same", activation="sigmoid")],
    name="generator")
Now we are ready to define the cGAN model:
class ConditionalGAN(keras.Model):
    def __init__(self, discriminator, generator, latent_dim):
        super().__init__()
        self.discriminator = discriminator
        self.generator = generator
        self.latent_dim = latent_dim
        self.gen_loss_tracker = keras.metrics.Mean(name="generator_loss")
        self.disc_loss_tracker = keras.metrics.Mean(name="discriminator_loss")

    @property
    def metrics(self):
        return [self.gen_loss_tracker, self.disc_loss_tracker]

    def compile(self, d_optimizer, g_optimizer, loss_fn):
        super().compile()
        self.d_optimizer = d_optimizer
        self.g_optimizer = g_optimizer
        self.loss_fn = loss_fn

    def train_step(self, data):
        # unpack the data:
        real_images, one_hot_labels = data

        # add dummy dimensions to the labels so that they can be concatenated with
        # the images:
        # this is for the discriminator:
        image_one_hot_labels = one_hot_labels[:, :, None, None]
        image_one_hot_labels = tf.repeat(
            image_one_hot_labels, repeats=[image_size * image_size])
        image_one_hot_labels = tf.reshape(
            image_one_hot_labels, (-1, image_size, image_size, num_classes))

        # sample random points in the latent space and concatenate the labels:
        # this is for the generator:
        batch_size = tf.shape(real_images)[0]
        random_latent_vectors = tf.random.normal(shape=(batch_size, self.latent_dim))
        random_vector_labels = tf.concat(
            [random_latent_vectors, one_hot_labels], axis=1)

        # decode the noise (guided by labels) to fake images:
        generated_images = self.generator(random_vector_labels)

        # combine them with real images. Note that we are concatenating the labels
        # with these images here:
        fake_image_and_labels = tf.concat([generated_images, image_one_hot_labels], -1)
        real_image_and_labels = tf.concat([real_images, image_one_hot_labels], -1)
        combined_images = tf.concat(
            [fake_image_and_labels, real_image_and_labels], axis=0)

        # assemble labels discriminating real from fake images:
        labels = tf.concat(
            [tf.ones((batch_size, 1)), tf.zeros((batch_size, 1))], axis=0)

        # train the discriminator:
        with tf.GradientTape() as tape:
            predictions = self.discriminator(combined_images)
            d_loss = self.loss_fn(labels, predictions)
        grads = tape.gradient(d_loss, self.discriminator.trainable_weights)
        self.d_optimizer.apply_gradients(
            zip(grads, self.discriminator.trainable_weights))

        # sample random points in the latent space:
        random_latent_vectors = tf.random.normal(shape=(batch_size, self.latent_dim))
        random_vector_labels = tf.concat(
            [random_latent_vectors, one_hot_labels], axis=1)

        # assemble labels that say "all real images":
        misleading_labels = tf.zeros((batch_size, 1))

        # train the generator:
        with tf.GradientTape() as tape:
            fake_images = self.generator(random_vector_labels)
            fake_image_and_labels = tf.concat([fake_images, image_one_hot_labels], -1)
            predictions = self.discriminator(fake_image_and_labels)
            g_loss = self.loss_fn(misleading_labels, predictions)
        grads = tape.gradient(g_loss, self.generator.trainable_weights)
        self.g_optimizer.apply_gradients(zip(grads, self.generator.trainable_weights))

        # monitor loss:
        self.gen_loss_tracker.update_state(g_loss)
        self.disc_loss_tracker.update_state(d_loss)
        return {
            "g_loss": self.gen_loss_tracker.result(),
            "d_loss": self.disc_loss_tracker.result()}
Finally, we initiate the cGAN model and train it:
cond_gan = ConditionalGAN(
    discriminator=discriminator, generator=generator, latent_dim=latent_dim)
cond_gan.compile(
    d_optimizer=keras.optimizers.Adam(learning_rate=0.0003),
    g_optimizer=keras.optimizers.Adam(learning_rate=0.0003),
    loss_fn=keras.losses.BinaryCrossentropy(from_logits=True))

cond_gan.fit(dataset, epochs=20)

# save the model weights for later use:
cond_gan.save_weights('cGAN_model_weights_MNIST')
At the end, we extract the trained generator from the trained cGAN:
trained_gen = cond_gan.generator
Generate samples from the trained cGAN
We will generate new images in such a way, that we interpolate between two classes of digits (start_class and end_class). Starting from one class, in the interpolation process we gradually change the class label towards the second class while generating images, which give a smooth transition of images from one class to another. We do so, to generate an animation of the interpolated images later. The animation helps us to get a better impression of how the GAN gradually transforms images of one digit into another. This process offers valuable insights into how the GAN captures and manipulates the underlying data distribution.
First, we need to set the number of intermediate images, that are generated in between the interpolation, and sample some noise for the interpolation:
num_interpolation = 50

# sample noise for the interpolation:
interpolation_noise = tf.random.normal(shape=(1, latent_dim))
interpolation_noise = tf.repeat(interpolation_noise, repeats=num_interpolation)
interpolation_noise = tf.reshape(interpolation_noise, (num_interpolation, latent_dim))
Next, we define the interpolation function that generates the images:
def interpolate_class(first_number, second_number):
    # Convert the start and end labels to one-hot encoded vectors.
    first_label = keras.utils.to_categorical([first_number], num_classes)
    second_label = keras.utils.to_categorical([second_number], num_classes)
    first_label = tf.cast(first_label, tf.float32)
    second_label = tf.cast(second_label, tf.float32)

    # Calculate the interpolation vector between the two labels.
    percent_second_label = tf.linspace(0, 1, num_interpolation)[:, None]
    percent_second_label = tf.cast(percent_second_label, tf.float32)
    interpolation_labels = (
        first_label * (1 - percent_second_label) + second_label * percent_second_label)

    # Combine the noise and the labels and run inference with the generator.
    noise_and_labels = tf.concat([interpolation_noise, interpolation_labels], 1)
    fake = trained_gen.predict(noise_and_labels)
    return fake
Now we are ready to generate the interpolated images and save them as a GIF:
start_class = 6
end_class = 1

fake_images = interpolate_class(start_class, end_class)

fake_images *= 255.0
converted_images = fake_images.astype(np.uint8)
converted_images = tf.image.resize(converted_images, (96, 96)).numpy().astype(np.uint8)
imageio.mimsave("animation.gif", converted_images[:,:,:,0])
Here is the resulting GIF:

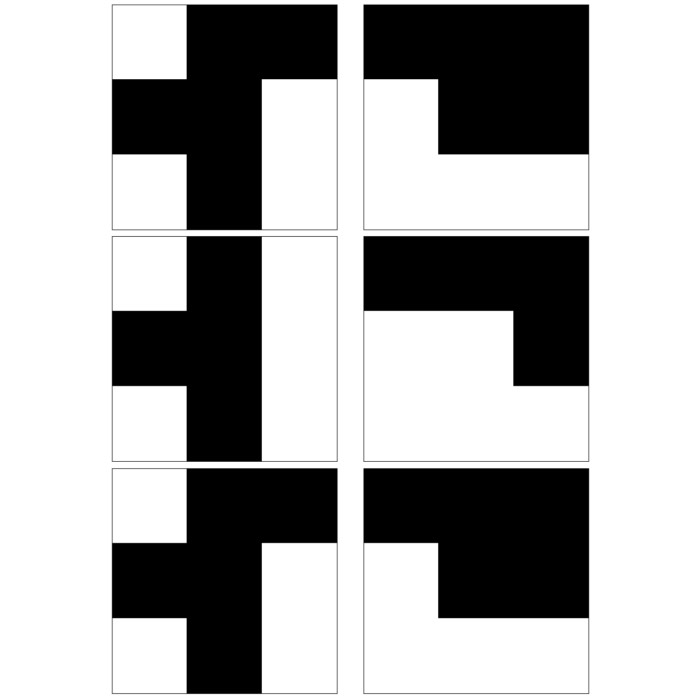
and two snapshots from the animation, highlighting the quality of the generated start and end image:
 Snapshots from the animation. Left: frame #10, showing the start digit “6”. Right: frame #49, showing the end digit “1”.
The results are already quite impressive, considering the simplicity of the model. To further improve the model performance and stability and to shorten the time to convergence, we could consider converting the cGAN into a conditioned Wasserstein GAN (WGAN). You can find out more about how to implement Wasserstein GANs in this post.
Conclusion
In summary, conditional Generative Adversarial Networks (cGANs) are a powerful class of generative models. They augment the GAN architecture with the capacity to conditionally generate data, thereby adding a controllable aspect to the data generation process. This makes them a highly practical, applicable and also fun tool for generating data.
The code used in this post is available in this GitHub repositoryꜛ.
If you have any questions or suggestions, feel free to leave a comment below.

Comments
Comment on this post by publicly replying to this Mastodon post using a Mastodon or other ActivityPub/Fediverse account.
Comments on this website are based on a Mastodon-powered comment system. Learn more about it here.
There are no known comments, yet. Be the first to write a reply.