Image registration in Napari
If you haven’t installed Napari yet, please do so before proceeding with this tutorial. To practice this tutorial, install the following package(s) in your activated Napari conda environment:
mamba install -y napari-assistant napari-pystackreg
What is image registration?
Live-cell fluorescence imaging involves capturing dynamic cellular events over time, which often introduces motion artifacts due to cell movement, sample drift, or instrument instability. The goal of image registration is to accurately align the sequential fluorescence images, compensating for these artifacts. By estimating and applying appropriate spatial transformations, such as translation, rotation, or deformation, image registration helps to minimize misalignments and facilitate the analysis of cellular dynamics with improved accuracy. It plays a crucial role in extracting reliable quantitative information from live-cell fluorescence imaging data.
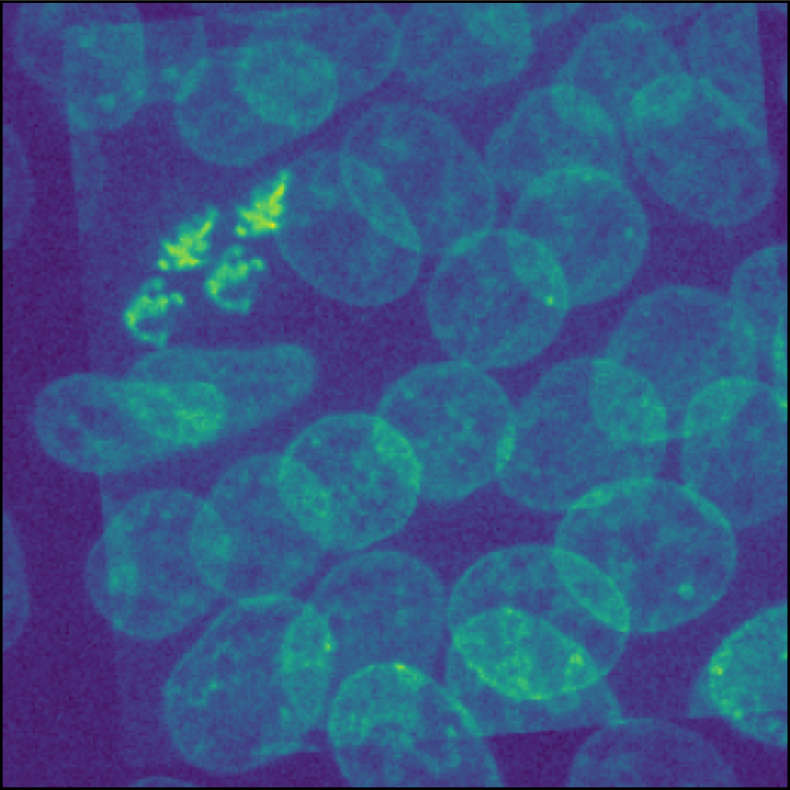 Overlay of two identical images. One image is translated and rotated against the other one. The goal of image registration is to find a transformation, that shifts the moved image back to its original position.
In this tutorial, we will skip the mathematical concept behind registration methods and focus on the practical application by using the Napari plugin pyStackReg. If you are interested in the mathematical background, you can find a detailed introduction to image registration in this blog post.
The pyStackReg plugin
pyStackReg provides correction the following five types of distortion:
- translation
- rigid body or Euclidean (translation + rotation)
- similarity or scaled rotation (translation + rotation + scaling)
- affine (translation + rotation + scaling + shearing)
- projective: translation + rotation + scaling + shearing + projective distortion
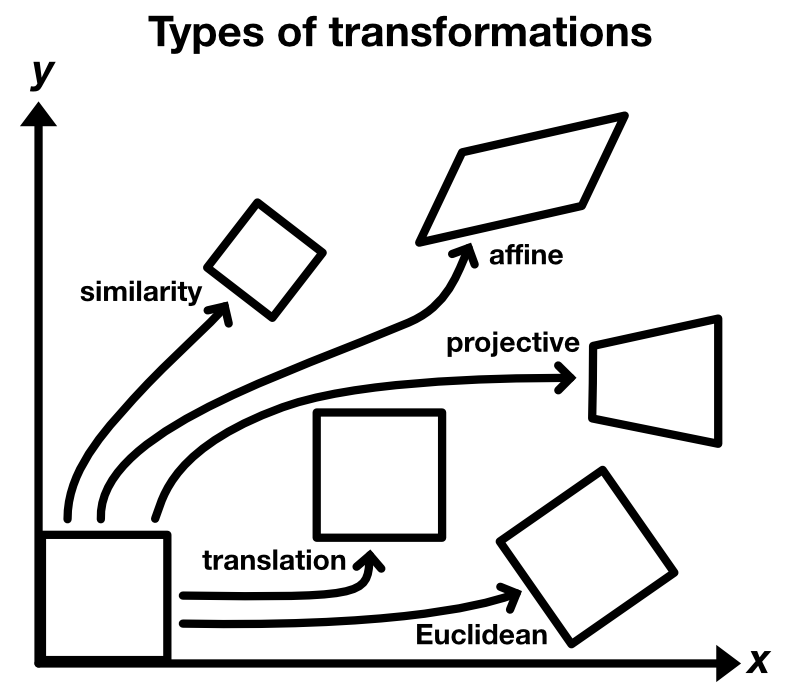 Type of transformations.
The plugin is directly ported from the source code of the ImageJ plugin TurboReg and provides additionally the functionality of the ImageJ plugin StackReg.
The usage of the plugin is as straightforward as for any other plugin we’ve learned so far. Simply load your image stack, that contains the motion artifacts, select the stack in the layer list, and then open the pyStackReg widget via the Plugins menu. The widget provides a drop-down menu to select the type of transformation and a button to start the registration. The registered image stack is added as new layer to the layer list:
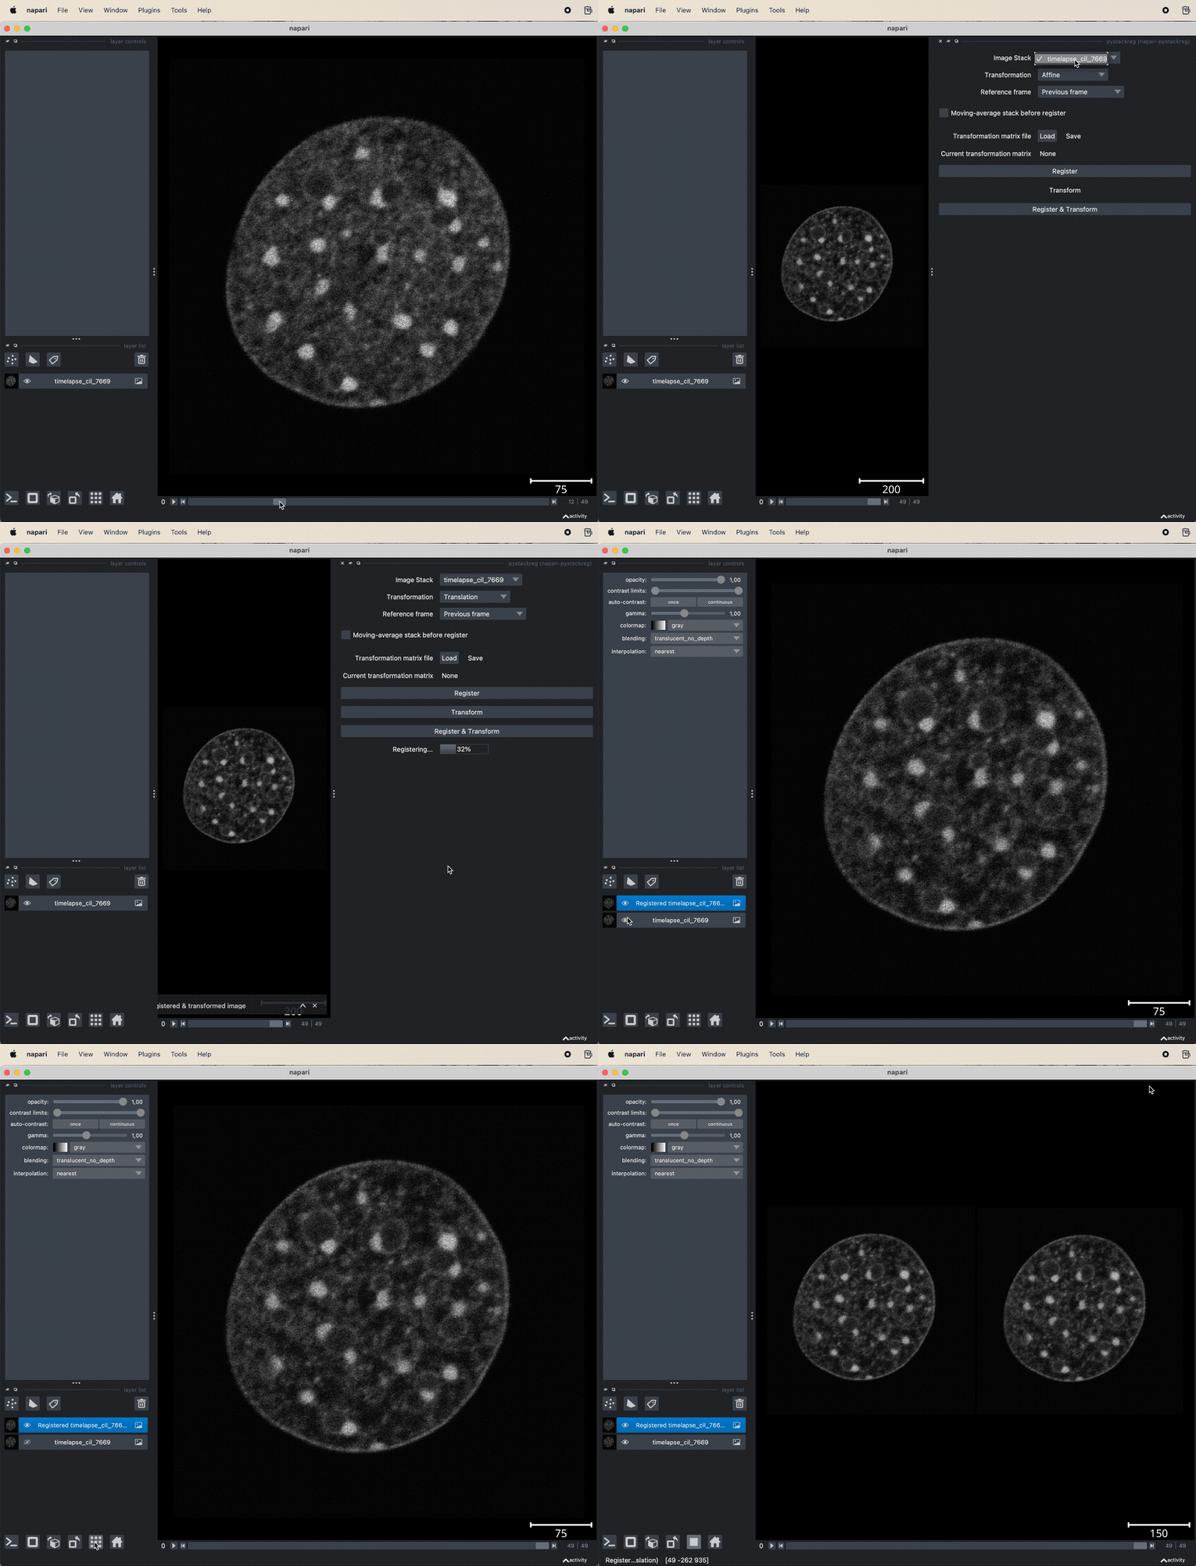 pyStackReg applied to the “timelapse_cil_7669” TIFF file provided in the data folder of this course (Cell Image Library CIL:7669ꜛ). The short time lapse demonstrating some amount of photo-bleaching has some minor translational motion artifacts. After the stack is registered, the motion artifacts are removed and the frames are spatially stable.
Manual image registration
The pyStackReg plugin provides a convenient way to register image stacks. However, it is not always possible to find the best transformation automatically. In such cases, we can use the Napari Assistant plugin to manually find the best transformation. To do so, proceed as follows:
- Load your unmoved reference image stack into Napari. This stack serves as our registration target or template.
- Load the moved image stack into Napari.
- Open the Assistant plugin via the
Plugins->Utilitiesmenu. - From the Assistant widget, choose the operation “Transform”. This opens the “Transform” widget as well as a new layer in the layer list called “Results of rigid_transform (clesperanto)…”. This is the layer that will contain the translated/registered image stack.
- In the “Transform” widget:
- Select the image layer that you want to transform (the moved image stack).
- As “Operation”, choose “rigid_transform (clesperanto)”.
- Enable “linear_interpolation”.
- Set all default values to zero (as a starting point).
- Now, start to translate and rotate the image stack by adjusting “translate_x”, “translate_y”, “translate_z” and “angle_around_z_in_degree” until the stack is aligned with the reference.
- Once you are satisfied with the transformation, save your result via
File->Save Selected Layer(s)...
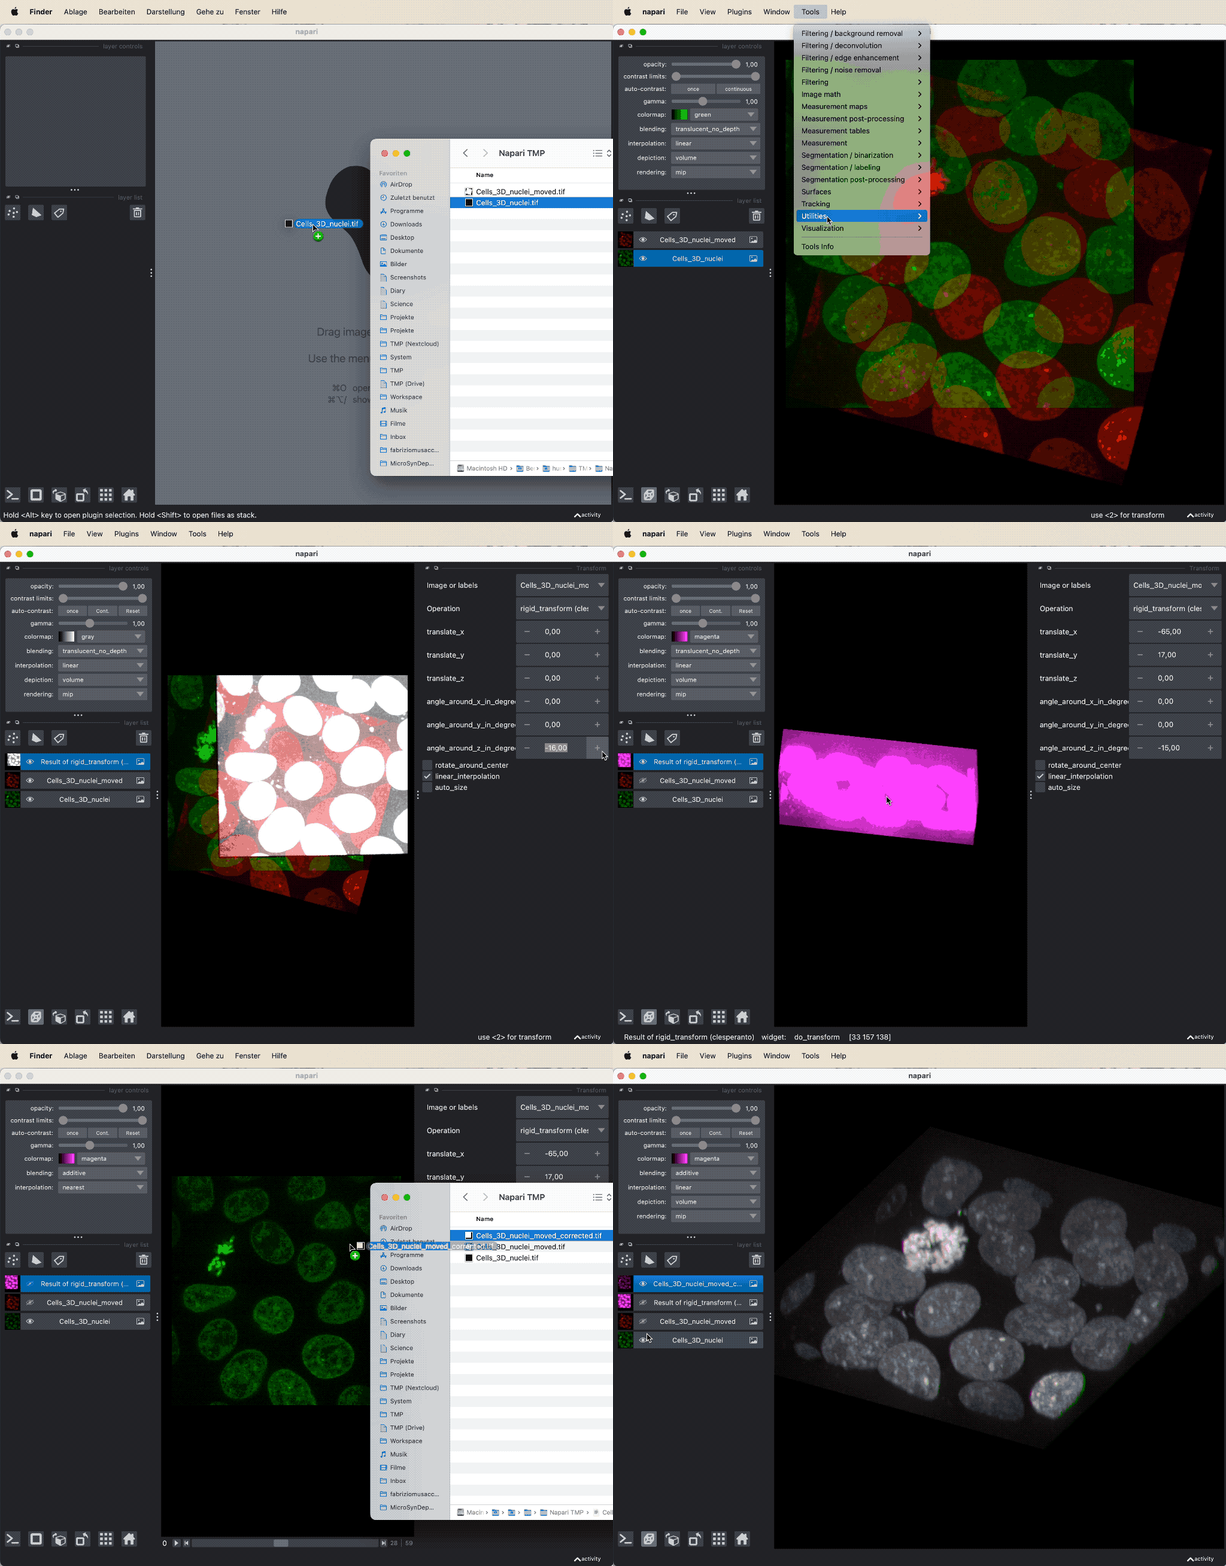 Manual image registration with the Napari Assistant plugin.
You may notice, that the image stack in the newly created layer (“Results of rigid_transform (clesperanto)…”) looks a bit weird. I don’t know the reason for this, but this is just some kind of visualization issue. If you save the layer as a TIFF file, the result is correct.
Tip
If the “glitch” bothers you while translating and rotating the stack, you can additionally apply a filter to the image stack “Results of rigid_transform (clesperanto)…”. This will create another layer in the layer list, that contains the filtered image stack. Proceed as described above, but instead of selecting the image stack “Results of rigid_transform (clesperanto)…”, select the filtered image stack layer. When you are satisfied with the transformation, select the original image stack “Results of rigid_transform (clesperanto)…”, enter the final values for the transformation, and save the layer as TIFF file.
Exercise
Load the “timelapse_ca_imaging_suite2p_file_00002_00001” TIFF file and apply the pyStackReg plugin to the image stack. Change the settings of the registration in order to find the best transformation to correct the motion artifacts.
Further readings
- Napari hub page of the pyStackReg pluginꜛ
- Blog post about image registration
- Ghosh, Rajarshi, Woodcock, Chris (2010) CIL:7669, Mus musculus. CIL. Dataset. doi.org/doi:10.7295/W9CIL7669ꜛ
Acknowledgement
The “timelapse_ca_imaging_suite2p_file_00002_00001” TIFF is a two-photon calcium image recording and part of the Suite2p sample image dataset, available from this shared Google Drive folderꜛ from the authors. Suite2p is a fast, accurate and scalable pipeline for calcium imaging data analysis, developed by Marius Pachitariu, Carsen Stringer and Kenneth D. Harris (2018)ꜛ. For more information, visit the Suite2p GitHub repositoryꜛ.
The image “timelapse_cil_7669” is taken from the Cell Image Libraryꜛ and has the ID CIL:7669. Please cite as Ghosh, Rajarshi, Woodcock, Chris (2010) CIL:7669, Mus musculus. CIL. Dataset. https://doi.org/doi:10.7295/W9CIL7669ꜛ.
