Using Zarr for images – The OME-ZARR standard
We can use the Zarr file format for storing image files such as for any other NumPy array. In this post we additionally explore the NGFF (next-generation file format) OME-ZARR standard for storing images with Zarr.
Let’s first prepare an example image by loading the cells3d image from the scikit-image package:
import numpy as np
from skimage import data, exposure
import plotly
import plotly.express as px
import plotly.io as pio
pio.renderers.default = "browser"

# load 4D image (3D + 2 channels) from the skimage samples:
array_3D = data.cells3d()

# select the nuclei channel and refine the image depth:
array_3D    = array_3D[22:54,1,:,:]
image_shape = array_3D.shape
print(image_shape)

# define a function for rescaling the intensity of each
# layer to enhance the visibility:
def enhance(image):
    vmin, vmax = np.percentile(image, q=(0.5, 99.5))
    image = exposure.rescale_intensity(image, in_range=(vmin, vmax),
                                       out_range=np.float32 )
    return image

# plot with plotly into the default browser:
fig = px.imshow(enhance(array_3D), animation_frame=0,
                binary_string=True, binary_format='jpg')
plotly.io.show(fig)
Storing images using default Zarr methods
We can store that image like any other NumPy array as a Zarr file to the disk using default Zarr i/o-syntax:
import zarr

# write the image as a Zarr array to disk:
chunks      = (1, image_shape[1], image_shape[2])
zarr_out_3D = zarr.open('zarr_3D_image.zarr', mode='w',
                        shape=array_3D.shape,
                        chunks=chunks,
                        dtype=array_3D.dtype)
zarr_out_3D[:] = array_3D

# reopen/read the Zarr array:
zarr_in_3D  = zarr.open('zarr_3D_image.zarr')
fig = px.imshow(enhance(zarr_in_3D[:]), animation_frame=0,
                binary_string=True, binary_format='jpg')
plotly.io.show(fig)
The generated plot is identical to the one shown above. For the remainder of this post I will not show that plot and refer to the one above.
The OME-NGFF/OME-ZARR standard
In 2020/2021, the Open Microscopy Environmentꜛ (OME) has proposedꜛ the next-generation file format (NGFF) specificationsꜛ (GitHubꜛ) for storing multi-resolution bioimaging data in the cloud. The OME defines this OME-NGFF called standard based on the Zarr file format, which provides the necessary support for storing and accessing arrays from distributed cloud storages. I will therefore refer to that standard as OME-ZARR for the remainder of this post.
Even though being proposed for the usage of images in the cloud, we can use it as a general standard for storing images as Zarr arrays (like the OME-TIFFꜛ specifications for storing TIFF files). The advantages of using such a standard are:
- standardization of the metadata (regarding both format and name definition, according the OME-XML structured annotations specificationsꜛ),
- standardization of the structure within the Zarr file (i.e., how the image is stored within the Zarr fileꜛ), and
- standardization of the Zarr-store format (Zarr storage specificationsꜛ).
This standardization enables developers to easily provide an API, that works for all OME-ZARR files in a unified manner. We can write image analysis pipelines and don’t have to care, how the hierarchy within a Zarr files might be organized – we can expect it to always be arranged and accessible in the same way. The standardization of the metadata also sets a clear frame for how to store and name image attributes such as the microscope metadata, image resolution or the channel specifications.
OME-ZARR with Python
In Python, the OME-ZARR standard is provided by the ome-zarr-pyꜛ package. Let’s take a look, how to store and read our example image from above accordingly:
from ome_zarr.io import parse_url
from ome_zarr.writer import write_image
from ome_zarr.reader import Reader
store = parse_url("zarr_3D_image.ome.zarr", mode="w").store
root  = zarr.group(store=store, overwrite=True)
write_image(image=array_3D, group=root, axes="zyx",
            storage_options=dict(chunks=chunks))
The parse_url(...).storeꜛ function creates a Zarr directory store in a specific format ("FormatV04") and with a specific dimension separator ("/"). This is equivalent to:
store = zarr.storage.FSStore("zarr_3D_image.ome.zarr", mode="w",
                             format="FormatV04",
                             dimension_separator="/")
root  = zarr.group(store=store, overwrite=True)
write_image(image=array_3D, group=root, axes="zyx",
            storage_options=dict(chunks=chunks, overwrite=True))
The write_image()ꜛ function saves the image to the created group (root) into the Zarr file by creating a pyramid of resolution levels (the default is five levels), where each image layer is down sampled by a factor of 2 with each level. This is why the stored image array actually consists of five sub-arrays/-folders within the Zarr file:
print(root.info)
print(root.tree())
  Name        : /
  Type        : zarr.hierarchy.Group
  Read-only   : False
  Store type  : zarr.storage.FSStore
  No. members : 5
  No. arrays  : 5
  No. groups  : 0
  Arrays      : 0, 1, 2, 3, 4

  /
   ├── 0 (32, 256, 256) uint16
   ├── 1 (32, 128, 128) uint16
   ├── 2 (32, 64, 64) uint16
   ├── 3 (32, 32, 32) uint16
   └── 4 (32, 16, 16) uint16
With the knowledge about the internal file structure, we can read the OME-ZARR file by using default Zarr i/o-syntax:
zarr_in_3D  = zarr.open("zarr_3D_image.ome.zarr")
fig = px.imshow(enhance(zarr_in_3D["0"][:]), animation_frame=0,
                binary_string=True, binary_format='jpg')
plotly.io.show(fig)
The ome-zarr-py packages also provides its own reader function, Reader()ꜛ:
# read the OME-ZARR file with the ome_zarr io-method:
reader = Reader(parse_url("zarr_3D_image.ome.zarr"))
# nodes may include images, labels etc.:
nodes = list(reader())
# first node will be the image pixel data at full resolution:
image_node = nodes[0]
zarr_in_3D = image_node.data
fig = px.imshow(zarr_in_3D[0][:], animation_frame=0,binary_string=True, binary_format='jpg')
plotly.io.show(fig)
Adding metadata
We can add OME-XMLꜛ-like metadata to the stored image array by assigning Zarr attributes. We follow the example from the ome-zarr-py documentation websiteꜛ and add some omero-styleꜛ rendering settings:
root.attrs["omero"] = {
    "channels": [{
        "color": "00FFFF",
        "window": {"start": 0, "end": 20},
        "label": "nuclei",
        "active": True,
    }]
}
Storing multiple images into one OME-ZARR file
We can also add more than one image to an OME-ZARR file by adding groups to the Zarr store:
store = zarr.storage.FSStore("zarr_3D_image_groups.ome.zarr",
                             mode="w",
                             format="FormatV04",
                             dimension_separator="/")
root  = zarr.group(store=store, overwrite=True)
root_sub_1 = root.create_group("sub_array_1", overwrite=True)
root_sub_2 = root.create_group("sub_array_2", overwrite=True)
root_sub_3 = root.create_group("sub_array_2/sub_sub_array_1", overwrite=True)
write_image(image=array_3D, group=root, axes="zyx",
            storage_options=dict(chunks=chunks, overwrite=True))
write_image(image=array_3D, group=root_sub_1, axes="zyx",
            storage_options=dict(chunks=chunks, overwrite=True))
write_image(image=array_3D, group=root_sub_2, axes="zyx",
            storage_options=dict(chunks=chunks, overwrite=True))
write_image(image=array_3D, group=root_sub_3, axes="zyx",
            storage_options=dict(chunks=chunks, overwrite=True))
print(root.tree())
  /
   ├── 0 (32, 256, 256) uint16
   ├── 1 (32, 128, 128) uint16
   ├── 2 (32, 64, 64) uint16
   ├── 3 (32, 32, 32) uint16
   ├── 4 (32, 16, 16) uint16
   ├── sub_array_1
   │   ├── 0 (32, 256, 256) uint16
   │   ├── 1 (32, 128, 128) uint16
   │   ├── 2 (32, 64, 64) uint16
   │   ├── 3 (32, 32, 32) uint16
   │   └── 4 (32, 16, 16) uint16
   └── sub_array_2
       ├── 0 (32, 256, 256) uint16
       ├── 1 (32, 128, 128) uint16
       ├── 2 (32, 64, 64) uint16
       ├── 3 (32, 32, 32) uint16
       ├── 4 (32, 16, 16) uint16
       └── sub_sub_array_1
           ├── 0 (32, 256, 256) uint16
           ├── 1 (32, 128, 128) uint16
           ├── 2 (32, 64, 64) uint16
           ├── 3 (32, 32, 32) uint16
           └── 4 (32, 16, 16) uint16
OME-ZARR arrays stored into groups can be accessed like default OME-ZARR arrays:
zarr_in_3D  = zarr.open("zarr_3D_image_groups.ome.zarr")
fig = px.imshow(enhance(zarr_in_3D["sub_array_1"]["0"][:]), animation_frame=0,
                binary_string=True, binary_format='jpg')
plotly.io.show(fig)
Adding labels
It is also possible to add labels directly to the OME-ZARR store. Let’s calculate some labels for our example image:
from skimage import segmentation as seg
from scipy import ndimage as ndi
from skimage.feature import peak_local_max
from skimage import filters
from scipy import ndimage
import matplotlib.pyplot as plt

def plot_projection(array3D, title="dummy 3D stack", projection_method="mean", axis=2):
    """
    Plot function: plots a 2D average intensity z-projection of an input 3D array.
    """
    fig = plt.figure(2, figsize=(5, 5))
    plt.clf()
    if projection_method =="mean":
        plt.imshow(array3D.mean(axis=axis))
        plt.title(title + "\naverage intensity z-projection", fontweight="bold")
    elif projection_method=="max":
        plt.imshow(array3D.max(axis=axis))
        plt.title(title+"\nmaximum intensity z-projection", fontweight="bold")
    plt.xlabel("x-axis", fontweight="bold")
    plt.ylabel("y-axis", fontweight="bold")
    plt.colorbar()
    plt.tight_layout()
    plt.show()
    plt.savefig(title+" projected.png", dpi=120)

# pre-filter the image stack:
array_3D_filtered = ndimage.median_filter(array_3D, size=7)
array_3D_filtered = filters.gaussian(array_3D_filtered, sigma=2)

# threshold:
threshold = filters.threshold_otsu(array_3D_filtered)
array_3D_threshold = array_3D_filtered > threshold

# segment array_3D_threshold via the watershed method:
distance     = ndi.distance_transform_edt(array_3D_threshold.astype("bool"))
max_coords   = peak_local_max(distance, min_distance=10,labels=array_3D_threshold.astype("bool"))
local_maxima = np.zeros_like(array_3D_threshold, dtype=bool)
local_maxima[tuple(max_coords.T)] = True
markers = ndi.label(local_maxima)[0]
labels  = seg.watershed(-distance, markers, mask=array_3D_threshold.astype("bool"))

# some control plots:
plot_projection(labels, title="dummy 3D stack labels", projection_method="max", axis=0)
plot_projection(enhance(array_3D), title="dummy 3D stack", projection_method="mean", axis=0)
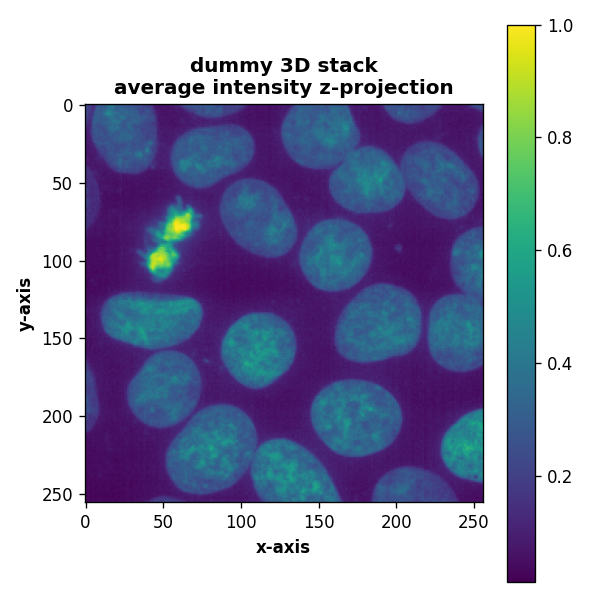
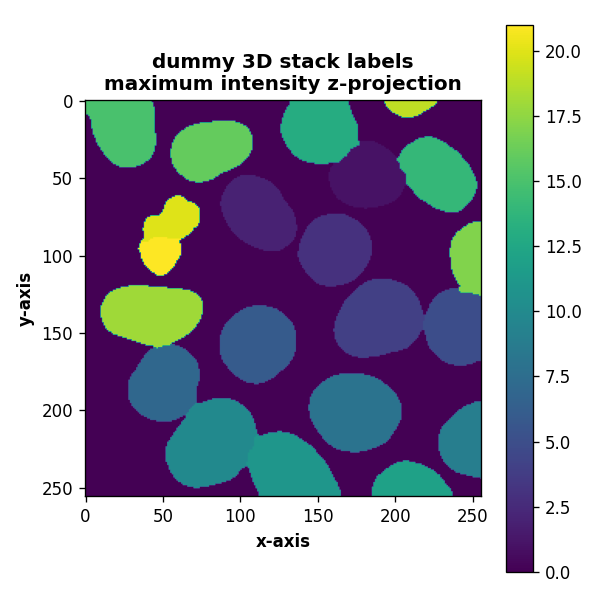
Now we write the labels to the OME-ZARR directory:
# create the OME-ZARR store:
store = parse_url("zarr_3D_image.ome.zarr", mode="w").store
root  = zarr.group(store=store, overwrite=True)
write_image(image=array_3D, group=root, axes="zyx",
            storage_options=dict(chunks=chunks))

# write the labels to "/labels":
labels_grp = root.create_group("labels", overwrite=True)
label_name = "watershed"
labels_grp.attrs["labels"] = [label_name]
label_grp = labels_grp.create_group(label_name)
# the 'image-label' attribute is required to be recognized as label:
label_grp.attrs["image-label"] = { }
write_image(labels, label_grp, axes="zyx")

# control plot:
zarr_in_3D  = zarr.open("zarr_3D_image.ome.zarr")
plot_projection(zarr_in_3D["labels/watershed"]["0"][:],
                title="dummy 3D stack read labels",
                projection_method="max", axis=0)

OME-ZARR in Napari
Napariꜛ is able to read OME-ZARR files via the napari-ome-zarrꜛ plugin:
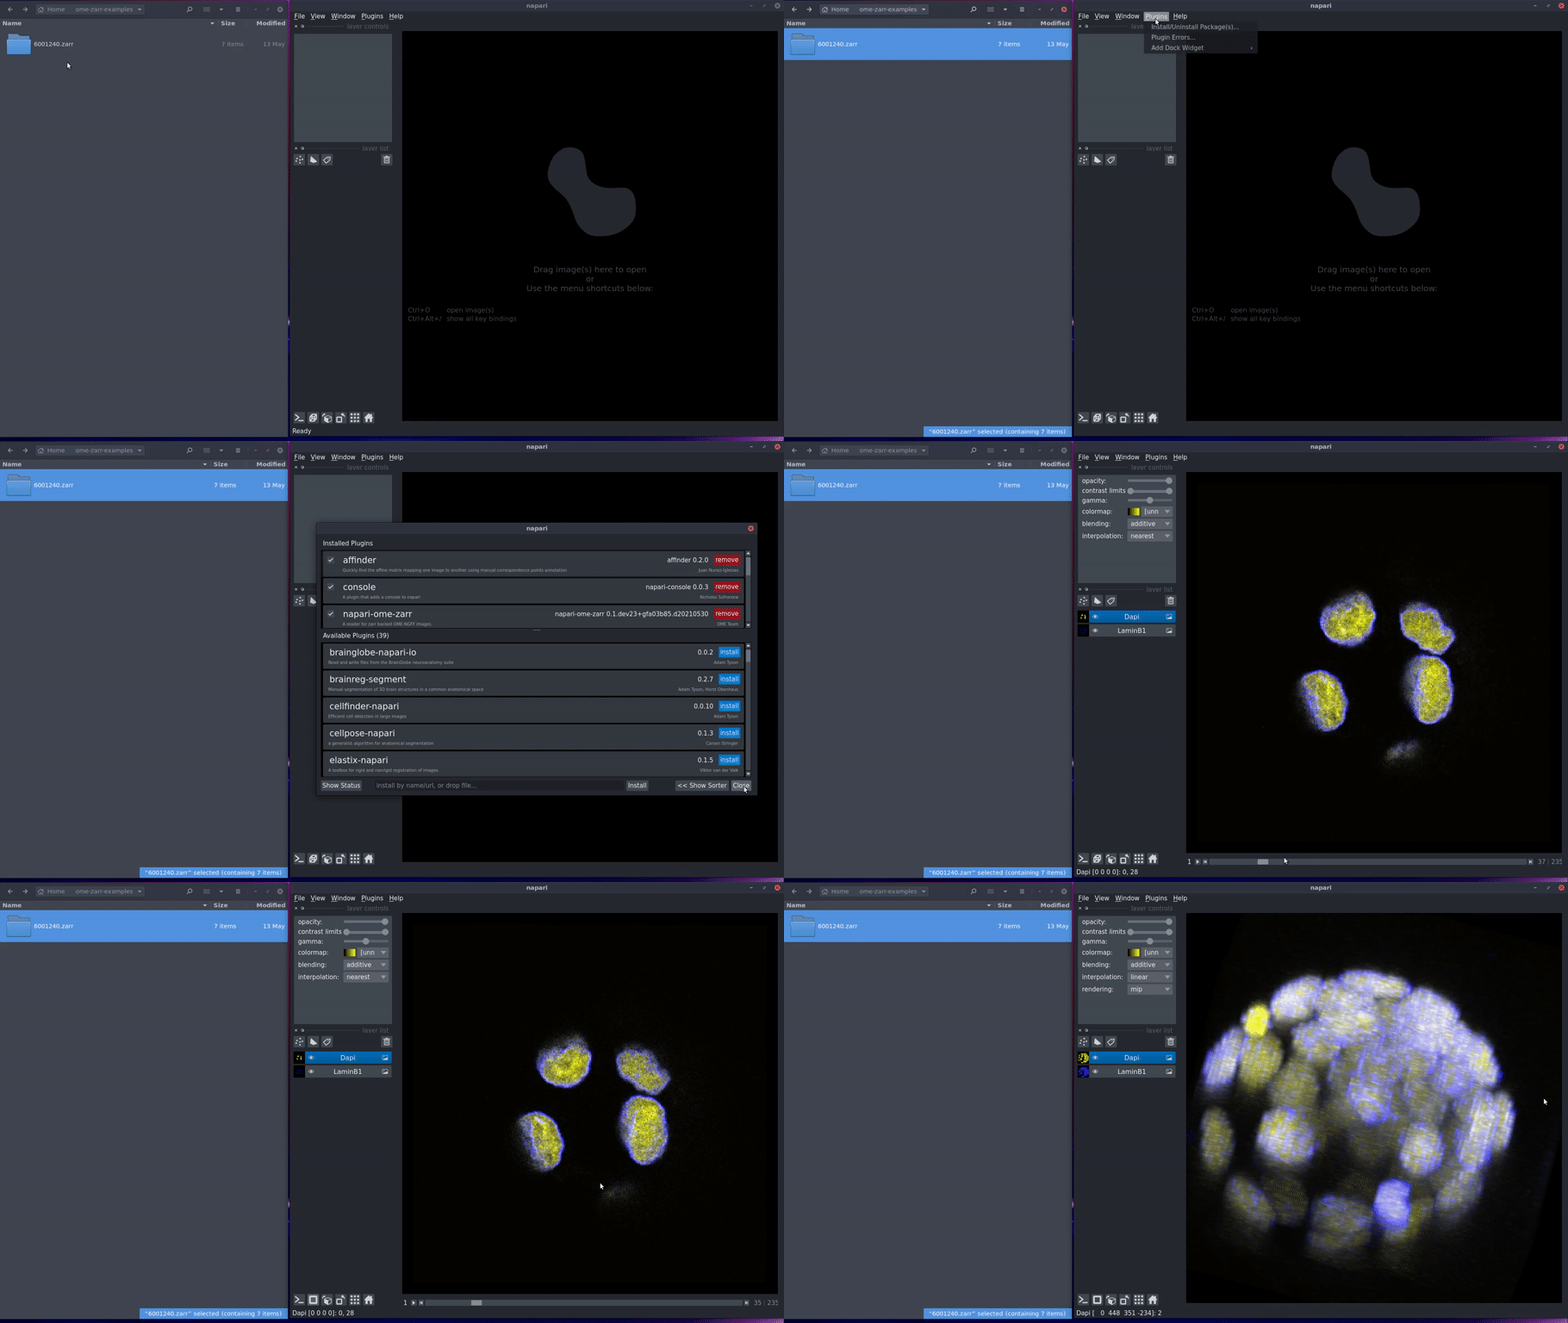 Image taken from https://www.napari-hub.org/plugins/napari-ome-zarr.
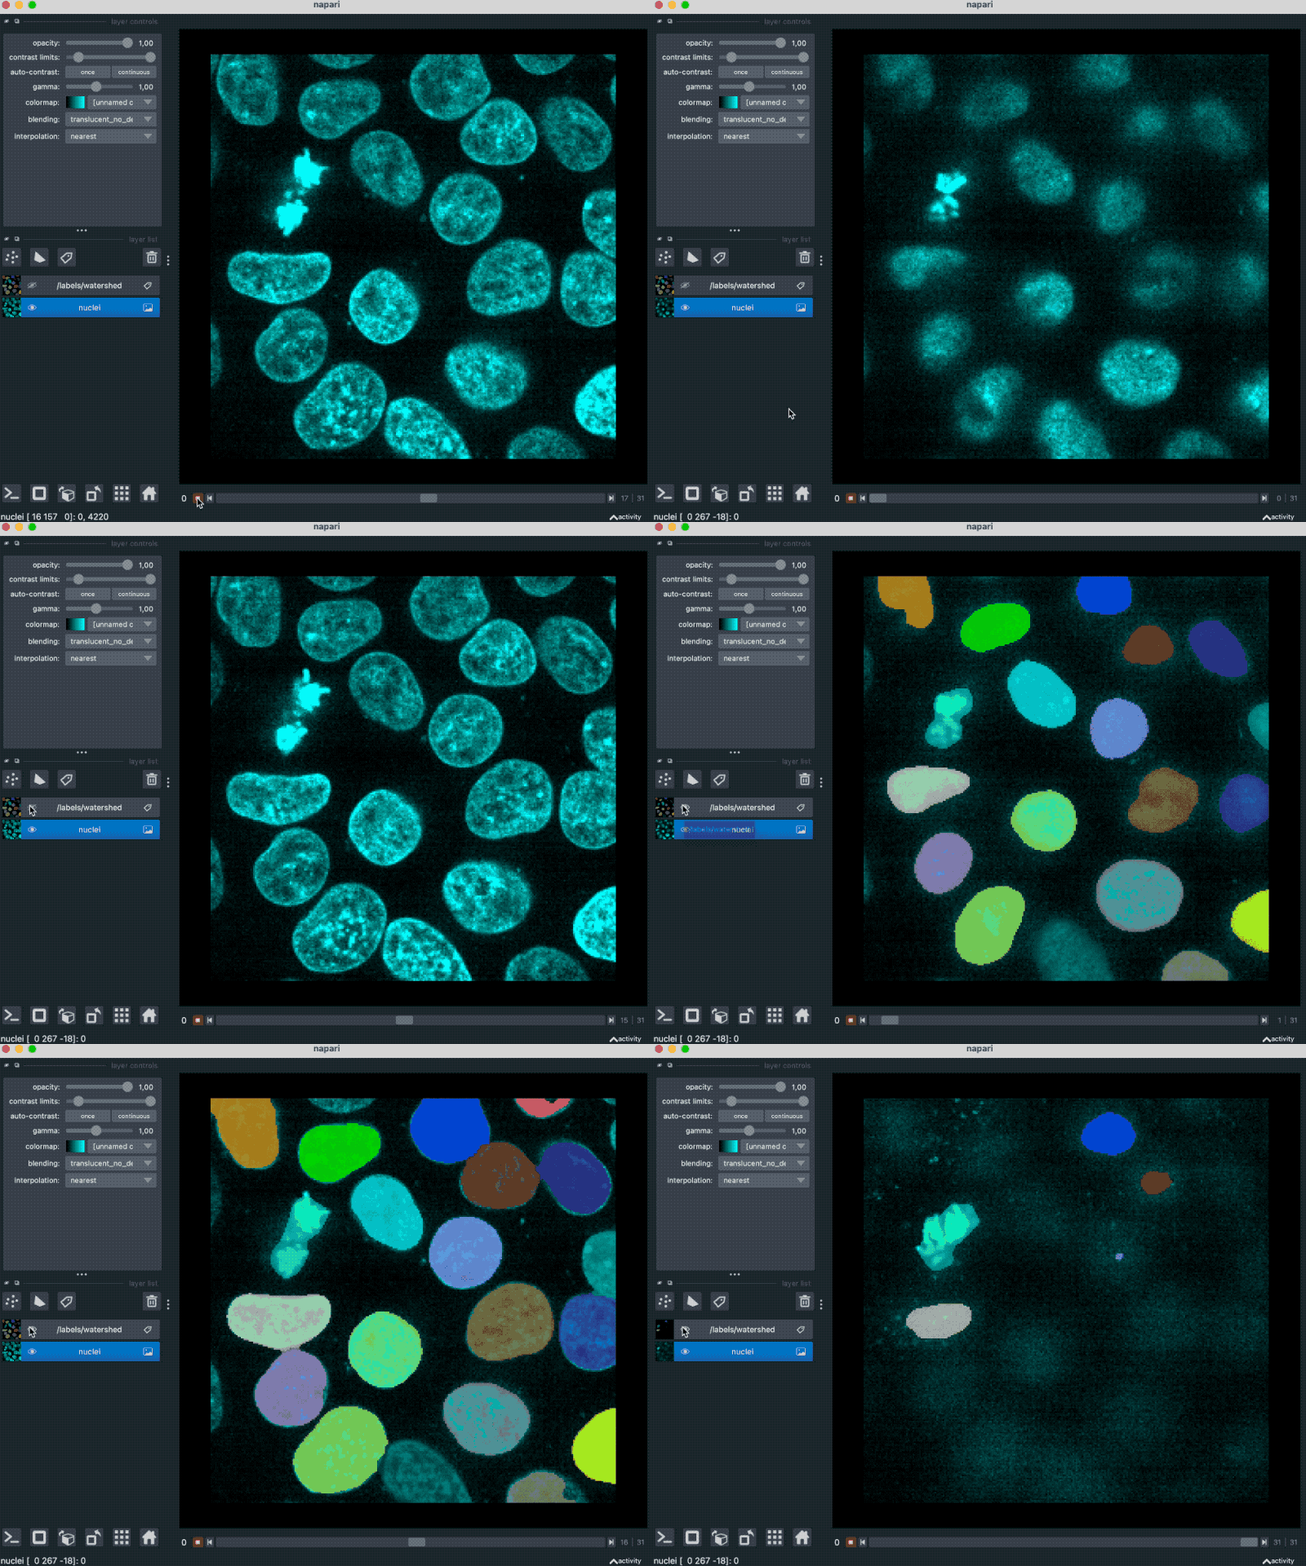
With that plugin, we can simply drag and drop our example OME-ZARR folder “zarr_3D_image.ome.zarr” into the Napari main window, and the image and the associated labels are read accordingly:
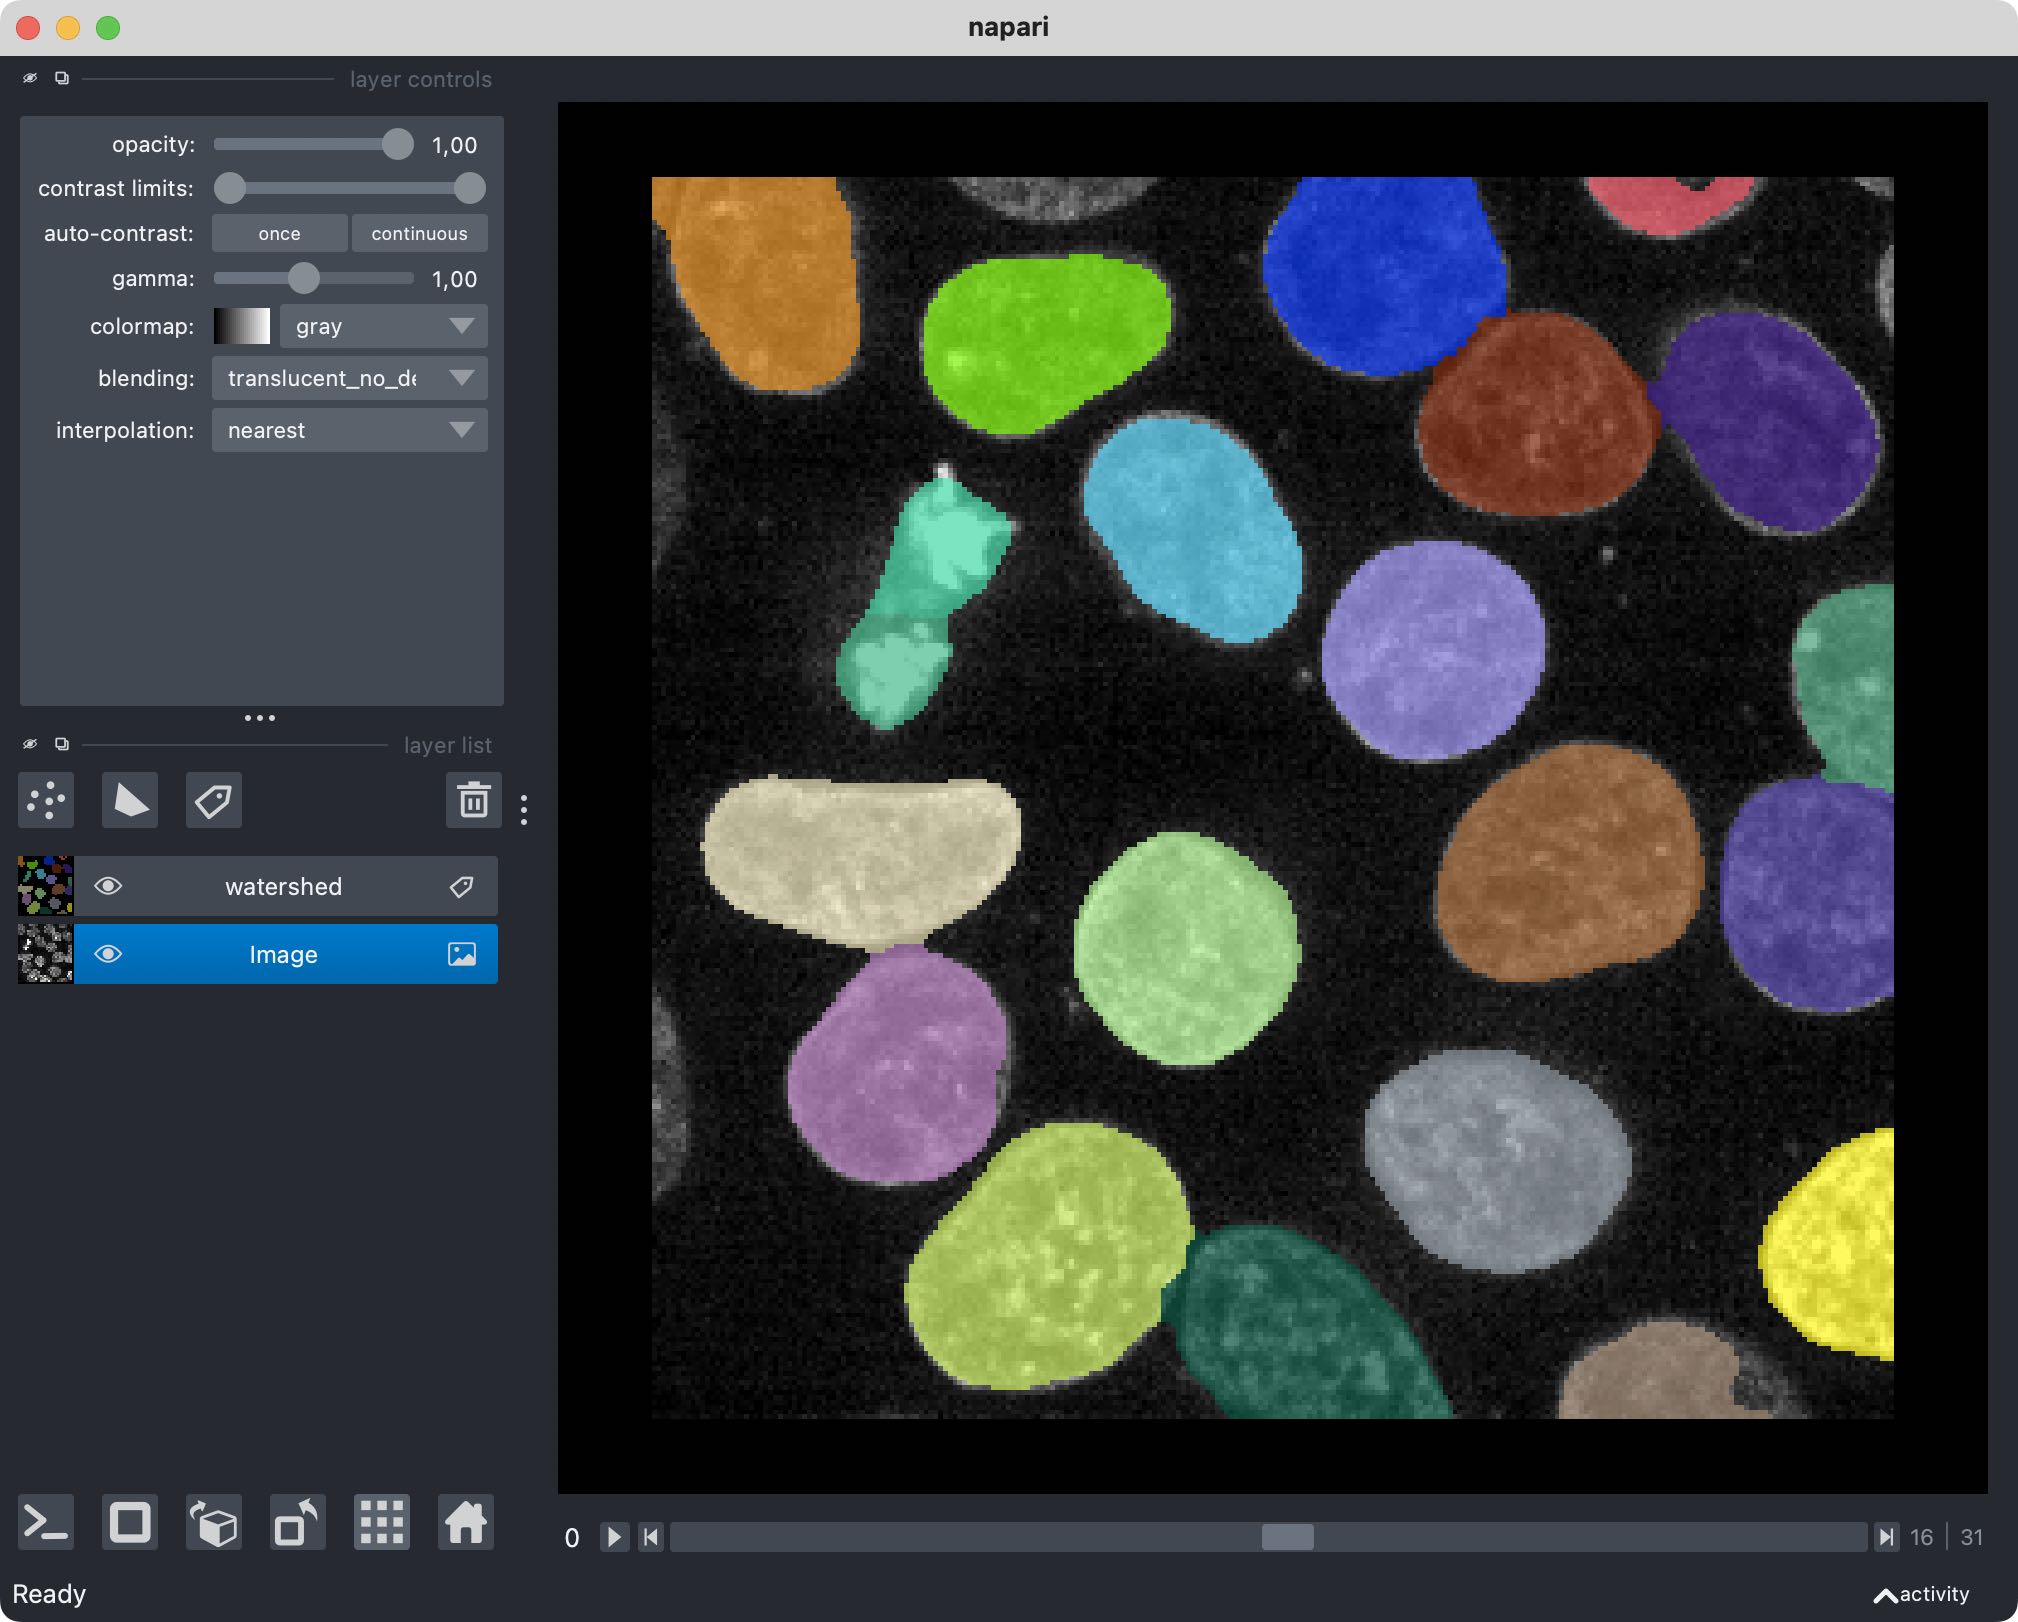
We can also pass the image to Napari via Python by opening the OME-ZARR file (or any other Zarr file) and handing over the desired Zarr array to Napari:
zarr_in_3D  = zarr.open("zarr_3D_image.ome.zarr")
viewer = napari.view_image(enhance(zarr_in_3D["0"][:]))
labels_layer = viewer.add_labels(zarr_in_3D["labels/watershed"]["0"][:],
                                 name='watershed')
By now, Napari is not the only image viewer that provides support for OME-ZARR files. There is for example Vizarrꜛ, and in my next post I will show, how to read OME-ZARR files in Fiji.
Accessing OME-ZARR images stored in the cloud
Finally, let’s see how we can access OME-ZARR images that are stored in the cloud:
path   = "https://uk1s3.embassy.ebi.ac.uk/idr/zarr/v0.1/6001246.zarr/"
store  = parse_url(path, mode="r").store
reader = Reader(parse_url(path))
nodes  = list(reader())
image_node = nodes[0]
read_data  = image_node.data
viewer = napari.view_image(read_data[0], channel_axis=0)
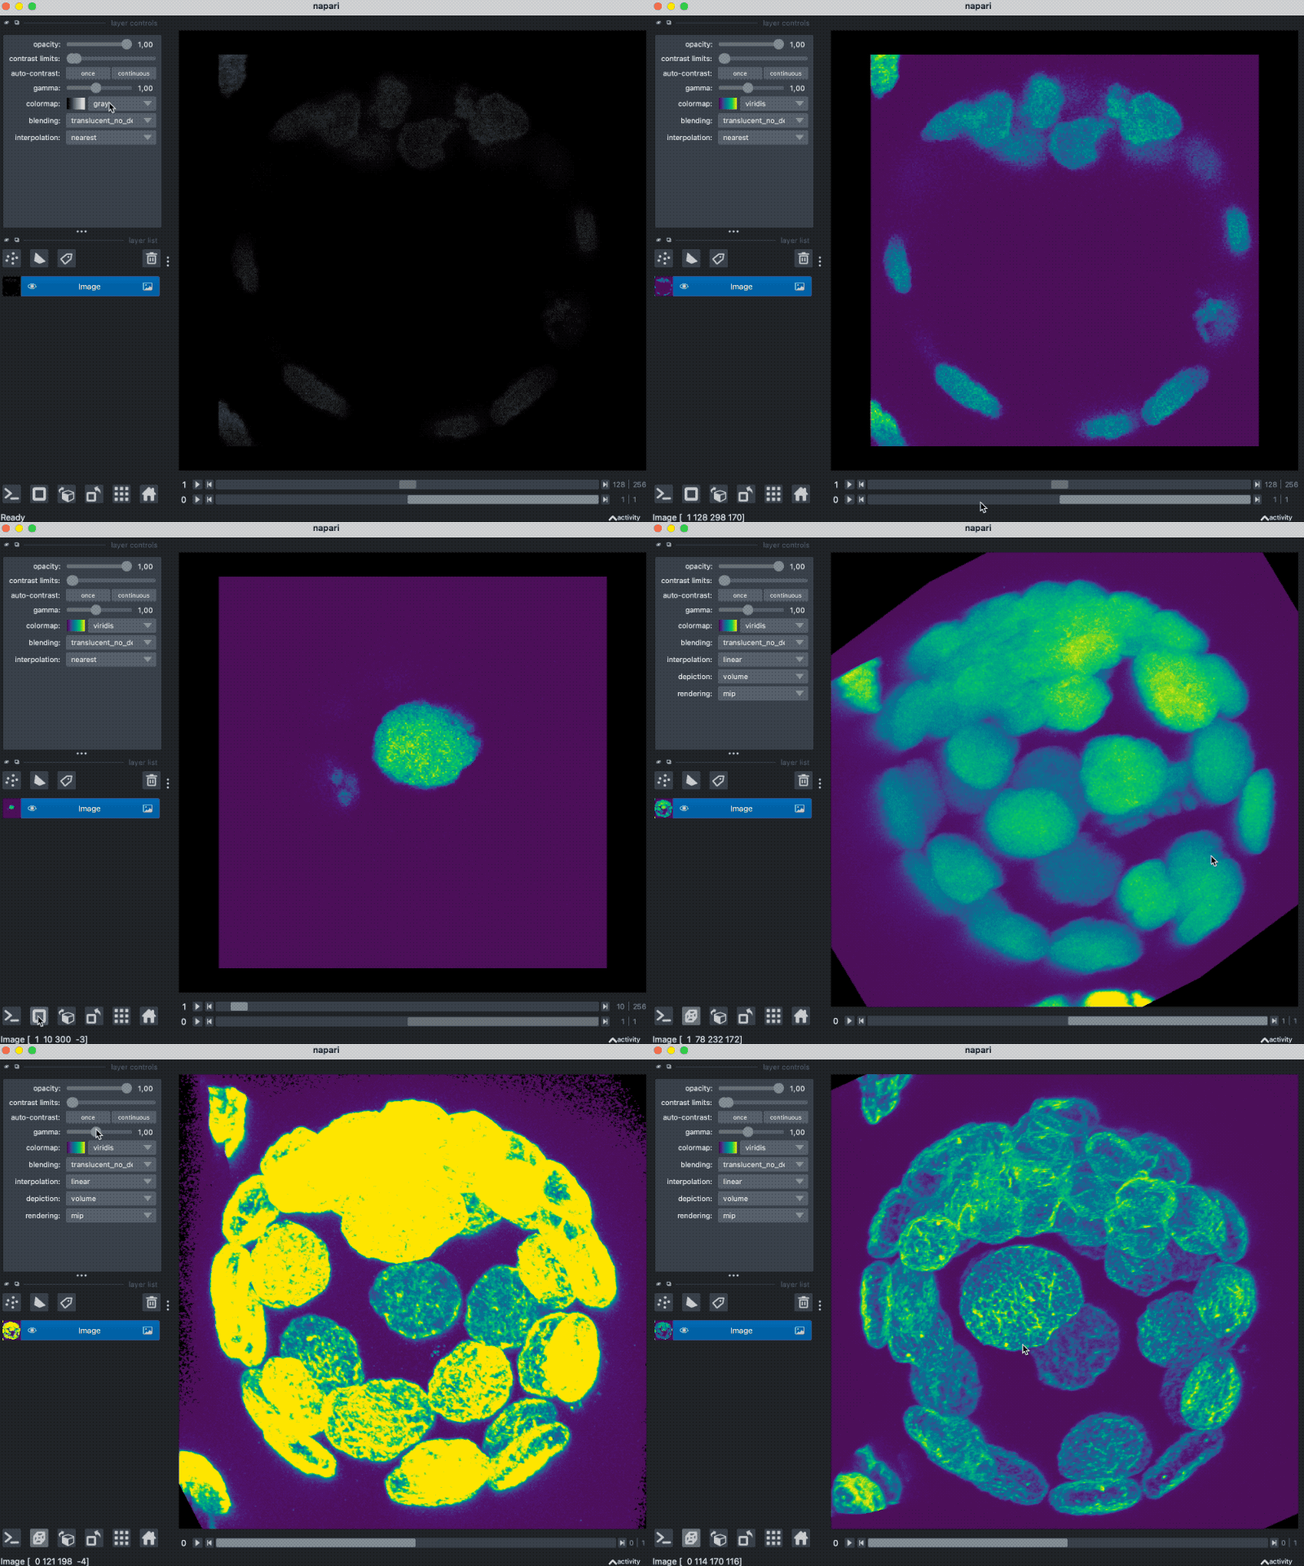
You can find more publicly available OME-ZARR samples hereꜛ and hereꜛ.
The Python code used in this post is also available in this GitHub repositoryꜛ.




comments